Sunday 29 December 2019

The Battle of Stratton

Having a few days off between Christmas and New Years I made plans to get at least one game in.  Initially it was to be an  ECW game using Pike and Shotte and an ACW game using Fire and Fury. It looks like the ACW game has been postponed (I'm pretty sure I wouldn't make it anyway now) but Murdock and I got our ECW game in yesterday.
This game was the opening round of our campaign using the Partizan Press books as a guide. We chose the Battle Stratton as a natural starting point. For this game we needed a lot of hedges judging by the map in the PP book English Civil War Scenarios, Vol. 2.  I had large number of hedges that I had inherited from Jeff partially finished (see this entry), however they were tidy, more modern, than one would find in your typical 17th century landscape; so I made some irregular hedging using the same methods and materials as described in this post.


We needed another terrain feature for this scenario and that was the remains of an iron age hill fort that the Parliamentarians were ensconced in. 
This piece falls into the "Close but Not Quite" category. As you can see with my 28mm figures, it is perfectly scaled 15mm...
 Although not much info is available about it (not even a Wikipedia page) I did find a little info and seems it was a small univallate hill fort with very little of it remaining today.
 The most prominent feature being a monument built in the early 18th century which I did not include for obvious reasons.

It turns out I needed another cannon as well, specifically a light gun. Although I didn't have a light cannon I did have the recently released galloper gun from Warlord Games; so I assembled it and painted up the crew to stand in for the light cannon.
I also took this opportunity to paint up some 1st. Corp artillery figures I had picked up for a spare cannon.
Really wonderful models. The face of the artillery officer is a highlight- sculpted to be painted.

So, on to the main event...

The Battle of Stratton (also known as The Battle of Stamford Hill) is early in the 2nd civil war, 16 May 1643. Having defeated Hopton earlier, the Earl of Stamford sent the majority of his cavalry away to occupy Bodmin. Despite outnumbering the Royalists, his forces were for the most part raw recruits and to mitigate the vulnerability of lacking sufficient cavalry, he took up a defensive position at the hill fort, and erected some hasty defences. 

Here the table is set up with the hill fort at top left as we look at the numerous hedges the Royalists regiments will have to cross. The brown strips are roads, of which their are two off camera to the right and one off camera to the left. All lead to the hill fort.
From the Royalist table edge with the enemy lining the hedges and behind defences in the distance:
Stamford's troops await the Royalist attackers:

As the Royalist commander I had the lesser forces, generally smaller regiments however nearly all my troops were veteran whereas two of the Parliamentarian battalias were composed entirely of Raw troops, although they did consist of larger regiments. Royalist foot troops were organised into 4 "divisions" each consisting of 2 small regiments and a gun. 

My initial plan was largely dictated by the terrain. I had three roads leading up the hill which I would have to make some use of. My plan was to advance one foot division up each road and move my cavalry up the road on my left, not out pacing the infantry.

Unfortunately I blew that plan up as soon as I started commanding regiments. To really make progress I had to clear the defenders in the fields on either side of the roads so I sent one regiment from each division to do that along with all of  Col. Godolphin's on my left. 

Hopton's men found it slow going; with the enemy to their front almost immediately and the hedges impeding  their movement. Here they are on turn 3 not much further along than in the picture above...
Sir Grenville's foot is caught in column on the road and charged by Merrick's pike. Bad news for the Royalists...
They gone...

After seeing off  Grenville's, Merrick's hops the hedge and successfully blocks the advance of Sir Berkely's :

In another display of plan deviation, the cavalry trot up the road in column only to get stuck in column; John Stowell's troop of horse get charged through a hedge by enemy pike men. They, somewhat unpredictably, loose the combat and flee from the field!

To add insult to injury, the same pike men win two more combats against Royalist horse, disordering them and forcing them to retire, completely neutering the Royalists' "advantage".
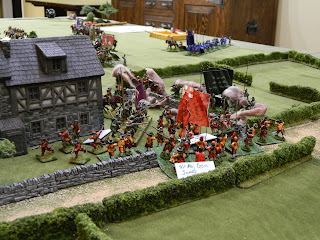
 In the photo below you can see the Parliamentarian pike men picnic-ing in amongst the Royalists Dragoons (on the right in red) and horse, whist Sir John Digby (foreground) looks on helplessly. 
 As the battle comes to a close, the majority of the Royalist foot have left, never getting more than about 18" from their table edge.

In summary, the general plan was OK but as the Royalist commander, my execution was very poor. In particular the issuing of orders. During the first 3 or 4 turns I forgot that units on roads and in column gained a +2 command value bonus. That was aggravated by the way I issued my orders as I consistently ordered my foot units to "advance to the hedge, cross hedge and form line".  What I should have ordered was "Advance to hedge, form line and cross hedge." That way, when I came up short on the command roll they would have been against the hedge in line instead of on the other side of the hedge in column (that's bad when in range of the enemy). In my haste to get up the hill I was tactically unsound. I did the same thing with my horse on my left flank. 

I also forgot lots of things rules-wise again; sometimes to my advantage, sometimes to my disadvantage (the Proximity rule went out the window, for example). Not sure if we missed something about horse and foot in melee, as the text of the rules suggests that foot in melee with horse was at a severe disadvantage but we couldn't find actual rules that supported the sentiment of the text and as a consequence the foot faired very well. 

We use a variation of the Movement rules crossing obstacles as found on the QRF at the back of the book. There are actually 3 different sets of rules: the rules under Obstacles on page 41; the Alternative rules listed on the same page;  the rules on the QRS which say it takes a whole turn(!) for a formed unit to cross an obstacle. We play it takes one whole move (ie  6" for foot) to cross an obstacle, as opposed to one whole turn. Although using them as printed in the text would certainly allow for more movement, we felt it costing a move was a good compromise.

Another issue is I still haven't quite nailed down is correlating the units sizes of P&S with the figure count in the Partizan books or how to best represent Raw and Veteran troops. Generally veteran troops we make Elite 4+. As disorder can really stall things, the Elite rule reduces regiments spending a lot of time standing around. Many of the units in the Partizan books are Small in P&S which makes them extremely vulnerable. If you have a whole battalia made up of Small units it can end up Broken pretty quick. Even if the units are all Veteran, the Elite rule isn't going to help with that. 

In summation...
...more work is needed!


Friday 29 November 2019

JR Miniatures Outhouse

In my recent Sarissa Precision order I received a free sample of their Terrain Tile System. As I had a 28mm JR Miniatures outhouse I needed a base for I decided to combine the two products.

I really like the irregular edge of the base; I beveled it to aid the base in blending into the table surface.

The base is treated in my standard manner: 2mm Woodland Scenics static grass, followed by a 4 mm - 6 mm blend of brighter green grass finished with a mix of home made and Super Turf shrubs.
The tree is Woodland Scenics with 3M stripping pad material and SuperLeaf for the canopy.
Although the casting on the building was much better than the 15 mm buildings I had painted previously, you can see some of the detail obscuring, stray resin on this close up shot of the door; not really noticeable from arms length though.

Monday 18 November 2019

A Start on More Hedging

We need a few extra hedges (several more feet actually...)  for our next ECW game. As the hedges I have already are a little too tidy and manicured for the period I have made a couple of sections that are more indicative of what would have been called a hedge back in the 17th century.
  They started off as 3M Stripping Pads cut and teased apart with pliers and a couple Woodland Scenics tree armatures glued onto wood salvaged from paint stirrers.

After spray priming of grey the bases were flocked with a little Scenic Express SuperLeaf brown foliage under the shrubbery followed by a layer of 2mm Woodland Scenics static grass and another layer of Peco Scene 4mm and 6mm static grass. 
 Some Army Painter grass tufts, a little bit of lichen and home made shrubs were also added before sprinkling the 3M pad material with SuperLeaf green foliage. I usually use a blend of medium green, light (or olive) green and a smattering of moss.

 These would probably line lane ways and ditches. Our lonely 28mm drover and his oxen to provide a sense of scale:


Monday 11 November 2019

15mm ACW Buildings From JR Miniatures

With an eye to another Fire and Fury game (possibly Corinth) sometime in the future I picked up some JR Miniatures 15mm ACW buildings from Meeplmart in Toronto.
The first building I tackled was Winter Quarters (JRM1630).
The detail in the windows was shallow but actually came out OK.  The shingles and the siding was rife with small bubbles. Something that was to become a bit of an issue with these buildings was the casting; poorly mixed resin is my guess. As it is a plain structure it has a lot of uses and would not be out of place for a century afterwards.

The nicest of the three buildings both in sculpting and in casting is Victorian House (JRM1608). Only a few bubbles here and there but the texture of the stone and the shingles is excellent.
 The black pitting in the window frames are air bubbles; they made painting the recessed windows a bit of a challenge.
The worst offender for casting issues was the 1859 Factory (JRM1611). The stonework was completely pockmarked. In the pictures below you can see the bubbles in the window frames and the roofing and the massive piece missing from the eave.
 The building itself is a little twisted as shown by the cockeyed windows.
Judging from the faded printing on the boxes these buildings had sat for quite some time at Meeplemart. I hope whoever is making these buildings now (if they are still in production) pays a little more attention to quality control as when they come out right they are nice buildings and fun to paint.

Monday 14 October 2019

Fenris Stone Walls

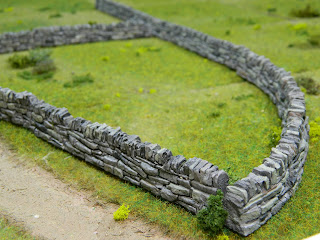
Quite awhile ago I ordered some Fenris 28mm dry stack stone walls for my Mordheim table (see the Kodsticklerburg link to the right). I never got around to using them however for our Battle of Denbigh Green game I needed some to go around the Ziterdes Mill House. So I did a bit of a rush job on them; all they got was a primer coat with GWs Grey Seer spray and a home made black wash. They actually looked pretty good but I wanted a little more variation in the stone.
I picked out about a third of the stones with Americana's Shale Green (one of my favourite colours for stone) and 3 or 4 on each side and on top with Americana's Pebble and Ceramacoat's Charcoal.
I thinned the with a mix of Golden's Acrylic Flow Release and water; this worked especially well the darker charcoal.
These are the nicest stone walls I have painted. I like them so much I just ordered some more: a couple more straight sections, some more curves and some corner pieces so I don't have the dead end corners you can see in the pictures. Great texture, clear definition between the stones and the casting was very nearly perfect.

Monday 7 October 2019

The Battle of Denbigh Green

In this game we re-fight an action, The Battle of Denbigh Green, November 1st 1645,  as laid out in the excellent Partizan Press book English Civil War Gaming Scenarios, Vol 2.. In this scenario Sir William Vaughan has lead a force to relieve the city of Chester of a siege. The Parliamentarians have sent a small army to intercept and drive off the relief force. Having caught word of the enemy's approach, Vaughan has set his few infantry at an important crossroads in a defensive position. Two small units of musketeers lay hidden in the hedges.
His Horse, cobbled together from the veterans of various regiments are deployed on Denbigh Green opposite the Parliamentarian Horse:


  Here the brigaded Shire foot march along in column towards the Royalist position.
A juicy target for an ambush but unfortunately, Sir Watt's musketeers are discovered and shot up before they can spring their trap:

As usual as the game progressed and I got more and more engrossed photos became rarer.
The cavalry battle on Denbigh green started well for the Royalists initially even though the first charge failed, Egerton's Horse were able to chase Greave's Horse from the table.
After that though the fragility of the small Royalist horse units started to tell as they soon found themselves Shaken and Disordered, unable to achieve much.
With the Parliamentarian foot in column on the road they were able to swoop up and combined with Sgt. Maj. Gen. James Lothian good command rating, the Chesire foot rated as reliable (+1 to Command rolls when issuing orders to that regiment) they and the Shire foot quickly cornered the Royalist regiments in the court yard. Shot from the front and the flank and then charged, the best unit, Prince Maurice's Firelocks fled the table:
Effectively ending the game as both Battalias were now broken, most of the remaining units also disordered severely compromising their ability to fight. The Royalist Horse reserves showed up just in time to see their co-combatants running for the table edge.  We decided to treat this game as if it were a campaign and continued playing to see how many Royalist units actually made it off the table.

Murdock, the Parliamentarian commander has posted better pictures and more description on his blog here.

Here are the forces, adapted from the Partizan Press book for Pike and Shotte; the profiles are from Warlord's To Kill A King supplement:


 I chose this scenario for two reasons: one, we would be using the Pike and Shotte rules we had only used once before in 2016. Secondly, it didn't require a lot of specific terrain pieces. Many of the relatively open battles require larger forces and I felt that as we were effectively relearning the rules I preferred smaller forces (roughly 4000 troops combined for both sides). I had already started on the hedges, the Ziterdes building came primed so the only structure that needed to be modeled was the ruined priory and the wall for that was already half painted.


I did an initial solo run through, but found that the Parliamentarian foot had a slow slog getting to the Royalist position. So I made a few changes that, in hind sight, may have made it a little too easy. Firstly, as we were playing by the rules for crossing obstacles on the QRS, I changed the cost of crossing obstacles to 1 whole move not 1 whole  turn. Secondly, I made the Chesire Foot Reliable which combined with being in March Column on road made the command roll for Lothian (Rating 9) to give them order a 12(!). I also removed two rows of hedges between White Church (the mill) and the Parliamentarian table edge.  Having said that, the result was pretty much historical with perhaps the defenders getting overwhelmed a little sooner than they did historically.

We got most of the rules right however I forgot that my Horse units coming on from reserve on the road from Denbigh Castle also got +2 to their Command roll and were allowed one move even on a failed order. As I did it for 2 turns in a row there is the slim  possibility that they may have made a difference. But ah well...