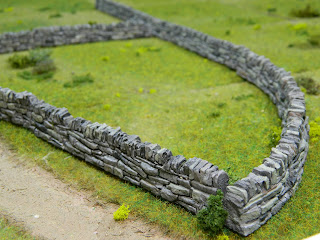
Quite awhile ago I ordered some Fenris 28mm dry stack stone walls for my Mordheim table (see the Kodsticklerburg link to the right). I never got around to using them however for our Battle of Denbigh Green game I needed some to go around the Ziterdes Mill House. So I did a bit of a rush job on them; all they got was a primer coat with GWs Grey Seer spray and a home made black wash. They actually looked pretty good but I wanted a little more variation in the stone.
I picked out about a third of the stones with Americana's Shale Green (one of my favourite colours for stone) and 3 or 4 on each side and on top with Americana's Pebble and Ceramacoat's Charcoal.
I thinned the with a mix of Golden's Acrylic Flow Release and water; this worked especially well the darker charcoal.
These are the nicest stone walls I have painted. I like them so much I just ordered some more: a couple more straight sections, some more curves and some corner pieces so I don't have the dead end corners you can see in the pictures. Great texture, clear definition between the stones and the casting was very nearly perfect.
Monday, 14 October 2019
Monday, 7 October 2019
The Battle of Denbigh Green
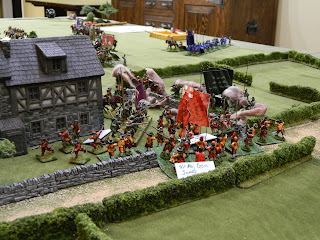
In this game we re-fight an action, The Battle of Denbigh Green, November 1st 1645, as laid out in the excellent Partizan Press book English Civil War Gaming Scenarios, Vol 2.. In this scenario Sir William Vaughan has lead a force to relieve the city of Chester of a siege. The Parliamentarians have sent a small army to intercept and drive off the relief force. Having caught word of the enemy's approach, Vaughan has set his few infantry at an important crossroads in a defensive position. Two small units of musketeers lay hidden in the hedges.
His Horse, cobbled together from the veterans of various regiments are deployed on Denbigh Green opposite the Parliamentarian Horse:
Here the brigaded Shire foot march along in column towards the Royalist position.
A juicy target for an ambush but unfortunately, Sir Watt's musketeers are discovered and shot up before they can spring their trap:
As usual as the game progressed and I got more and more engrossed photos became rarer.
The cavalry battle on Denbigh green started well for the Royalists initially even though the first charge failed, Egerton's Horse were able to chase Greave's Horse from the table.
I chose this scenario for two reasons: one, we would be using the Pike and Shotte rules we had only used once before in 2016. Secondly, it didn't require a lot of specific terrain pieces. Many of the relatively open battles require larger forces and I felt that as we were effectively relearning the rules I preferred smaller forces (roughly 4000 troops combined for both sides). I had already started on the hedges, the Ziterdes building came primed so the only structure that needed to be modeled was the ruined priory and the wall for that was already half painted.
I did an initial solo run through, but found that the Parliamentarian foot had a slow slog getting to the Royalist position. So I made a few changes that, in hind sight, may have made it a little too easy. Firstly, as we were playing by the rules for crossing obstacles on the QRS, I changed the cost of crossing obstacles to 1 whole move not 1 whole turn. Secondly, I made the Chesire Foot Reliable which combined with being in March Column on road made the command roll for Lothian (Rating 9) to give them order a 12(!). I also removed two rows of hedges between White Church (the mill) and the Parliamentarian table edge. Having said that, the result was pretty much historical with perhaps the defenders getting overwhelmed a little sooner than they did historically.
We got most of the rules right however I forgot that my Horse units coming on from reserve on the road from Denbigh Castle also got +2 to their Command roll and were allowed one move even on a failed order. As I did it for 2 turns in a row there is the slim possibility that they may have made a difference. But ah well...
His Horse, cobbled together from the veterans of various regiments are deployed on Denbigh Green opposite the Parliamentarian Horse:
Here the brigaded Shire foot march along in column towards the Royalist position.
A juicy target for an ambush but unfortunately, Sir Watt's musketeers are discovered and shot up before they can spring their trap:
The cavalry battle on Denbigh green started well for the Royalists initially even though the first charge failed, Egerton's Horse were able to chase Greave's Horse from the table.
After that though the fragility of the small Royalist horse units started to tell as they soon found themselves Shaken and Disordered, unable to achieve much.
With the Parliamentarian foot in column on the road they were able to swoop up and combined with Sgt. Maj. Gen. James Lothian good command rating, the Chesire foot rated as reliable (+1 to Command rolls when issuing orders to that regiment) they and the Shire foot quickly cornered the Royalist regiments in the court yard. Shot from the front and the flank and then charged, the best unit, Prince Maurice's Firelocks fled the table:
Effectively ending the game as both Battalias were now broken, most of the remaining units also disordered severely compromising their ability to fight. The Royalist Horse reserves showed up just in time to see their co-combatants running for the table edge. We decided to treat this game as if it were a campaign and continued playing to see how many Royalist units actually made it off the table.
Murdock, the Parliamentarian commander has posted better pictures and more description on his blog here.
Here are the forces, adapted from the Partizan Press book for Pike and Shotte; the profiles are from Warlord's To Kill A King supplement:
I did an initial solo run through, but found that the Parliamentarian foot had a slow slog getting to the Royalist position. So I made a few changes that, in hind sight, may have made it a little too easy. Firstly, as we were playing by the rules for crossing obstacles on the QRS, I changed the cost of crossing obstacles to 1 whole move not 1 whole turn. Secondly, I made the Chesire Foot Reliable which combined with being in March Column on road made the command roll for Lothian (Rating 9) to give them order a 12(!). I also removed two rows of hedges between White Church (the mill) and the Parliamentarian table edge. Having said that, the result was pretty much historical with perhaps the defenders getting overwhelmed a little sooner than they did historically.
We got most of the rules right however I forgot that my Horse units coming on from reserve on the road from Denbigh Castle also got +2 to their Command roll and were allowed one move even on a failed order. As I did it for 2 turns in a row there is the slim possibility that they may have made a difference. But ah well...
Subscribe to:
Posts (Atom)


