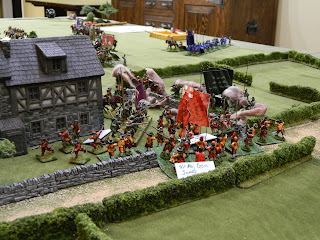
His Horse, cobbled together from the veterans of various regiments are deployed on Denbigh Green opposite the Parliamentarian Horse:
Here the brigaded Shire foot march along in column towards the Royalist position.
A juicy target for an ambush but unfortunately, Sir Watt's musketeers are discovered and shot up before they can spring their trap:
The cavalry battle on Denbigh green started well for the Royalists initially even though the first charge failed, Egerton's Horse were able to chase Greave's Horse from the table.
After that though the fragility of the small Royalist horse units started to tell as they soon found themselves Shaken and Disordered, unable to achieve much.
With the Parliamentarian foot in column on the road they were able to swoop up and combined with Sgt. Maj. Gen. James Lothian good command rating, the Chesire foot rated as reliable (+1 to Command rolls when issuing orders to that regiment) they and the Shire foot quickly cornered the Royalist regiments in the court yard. Shot from the front and the flank and then charged, the best unit, Prince Maurice's Firelocks fled the table:
Effectively ending the game as both Battalias were now broken, most of the remaining units also disordered severely compromising their ability to fight. The Royalist Horse reserves showed up just in time to see their co-combatants running for the table edge. We decided to treat this game as if it were a campaign and continued playing to see how many Royalist units actually made it off the table.
Murdock, the Parliamentarian commander has posted better pictures and more description on his blog here.
Here are the forces, adapted from the Partizan Press book for Pike and Shotte; the profiles are from Warlord's To Kill A King supplement:
I did an initial solo run through, but found that the Parliamentarian foot had a slow slog getting to the Royalist position. So I made a few changes that, in hind sight, may have made it a little too easy. Firstly, as we were playing by the rules for crossing obstacles on the QRS, I changed the cost of crossing obstacles to 1 whole move not 1 whole turn. Secondly, I made the Chesire Foot Reliable which combined with being in March Column on road made the command roll for Lothian (Rating 9) to give them order a 12(!). I also removed two rows of hedges between White Church (the mill) and the Parliamentarian table edge. Having said that, the result was pretty much historical with perhaps the defenders getting overwhelmed a little sooner than they did historically.
We got most of the rules right however I forgot that my Horse units coming on from reserve on the road from Denbigh Castle also got +2 to their Command roll and were allowed one move even on a failed order. As I did it for 2 turns in a row there is the slim possibility that they may have made a difference. But ah well...


Really great game Rob, either way.
ReplyDeleteLooking back, one more row of hedges would have made for more tactical action, though my Cheshire regiment would just have been more of the Kool Aid man bashing into each enclosed field, though it may have slowed things up two more moves ... which may have been enough for the relief horse to have a bigger impact.
With the wild command die rolls we were having in might not have changed anything.
Great looking game, and it sounds like you both had fun :D
ReplyDeleteYes, it was lots of fun. It was the first time I had adapted a scenario, provided the ORBATs and the terrain. It was a really enjoyable process.
DeleteNice looking game! The building is really great. Which of the Ziterdes' is this?
ReplyDeleteAre you planning to play again following your experiences from the first two games?
Thanks Jonathan. It is the Mill House:
Deletehttps://www.ziterdes.com/buildings/houses/mill-court-4-33-x-3-94-x-6-70-6012007.html
Nice sized game. Thanks.
ReplyDeleteVery nice looking. I have the same problem of taking time to take pics when the game grows too fast ad furious. 😀
ReplyDeleteThank you very much guys.
ReplyDeleteBattle of matte vs gloss =P
ReplyDeleteThe flags look great as does the battle set up in general.
Looks great.
ReplyDeleteCan't work out if the chap at the back of Sir Watts's musketeers has been shot or if he is having a theatrical tantrum due to the failure of their cunning plan. ;-)
Lol that's actually one of Murdock's Disorder markers.
DeleteLovely terrain and figures. Forgetting to take photos is one of the downsides of an engrossing game.
ReplyDeletevery nice terrain and minis!!
ReplyDeleteNice report, nice game :)
ReplyDeleteThank you all for your positive comments.
ReplyDeleteSuperb, wonderful minis!
ReplyDeleteLovely small action!
ReplyDeleteVery nice looking game
ReplyDelete