Monday 20 December 2021

Customised Warbases Church

 It seems a necessary piece of table top dressing for any ECW campaign is a little old English church. For some time now I had the intention of building or buying one; in the end I settled for a  MDF kit from Warbases, although I have added quite a bit to it. 


I essentially used the MDF kit as a starting point, a frame onto which I added 3 main  extras:

  • Slaters Plastikard 7mm dressed Stone for the walls
  • custom made and cast slate roof 
  •  quoins and window trim sculpted from grey stuff
Here we have it before the customisation:


And after:


I didn't use the windows that came with the kit but instead I glued drywall mesh to the inside of the building and painted it black.


For the front of the entrance I glued sheet styrene, textured with a craft knife to represent wood, to the MDF. The walkway is foam pavers.


The tree is a plastic Woodland Scenics armature with my standard foliage recipe. The most time consuming part of the build was making the roof. I wanted something that was a bit more 3D than the paper offering and although the slates did come out a smidge fantasy I am quite happy with them. I made two moulds so I will be able to make them up quickly should I decide to make a similar roof later.


 I'm not 100% confident in my colour choice for the quoins; in the end I am satisfied but I think If I was going to do it over I think I would go with something a little more tan, a little less yellowy orange.


I cannot recall where I bought the statue; I originally bought it for my Mordheim project and had forgot about it- I just remembered it yesterday- but it is a beautiful little piece of work.


What's a church yard with out grave stones? These ones are simply made from XPS foam.


One of the reasons I chose the Warbases kit is that it has a small footprint on the table. I think if I was building it specifically for skirmish gaming I would have gone with a bigger kit, like Sarissa Precision's church.


Hopefully there won't be such a long break between posts through the next few months. Works slows down during winter and I have some ECW figures lined for the Analogue Hobby Painting Challenge which starts in about two and a half hours.

Saturday 25 September 2021

18mm Crimean War French

After what seems like a very long time I have completed the Eureka 18mm Crimean War French.


Eureka's French come in 3 different poses, in 2 types of head wear; shako:

And Kepi:
Conveniently the French uniforms have essentially the same colour as the Turks; this project did finish off my bottle of Army Painter red.

I would say that these figures were better sculpted than the Turks; I'm not sure if it is the same sculptor or a different one.

I found the faces and the hands to have better definition, easier to paint, . This officer chose to wear his optional 'steel grey' trousers instead of red: 

The French also have a very nice little cannon to accompany them:


I see that Eureka has an Army Commander pack for the French so I may order one of those and pick up another gun while I am at it.


Monday 2 August 2021

The Battle of Freezing Hill

 The last Sunday of July saw Murdock and I resume our ECW campaign with The Battle of Freezing Hill, a prelude to the main event, Lansdowne Hill.

After scouting out Lansdowne Hill the previous day, Lord Hopton's Royalist force returned the following morning to occupy it only to discover that William Waller's army had ensconced itself at the crest of it in the meantime. 

After deploying for battle and seeing the Waller had no intention of leaving Lansdowne Hill, Hopton retired towards Marshfield. Waller sent out a harassing force and Hopton was obliged to present some of his army as a rearguard; this battle is the result.

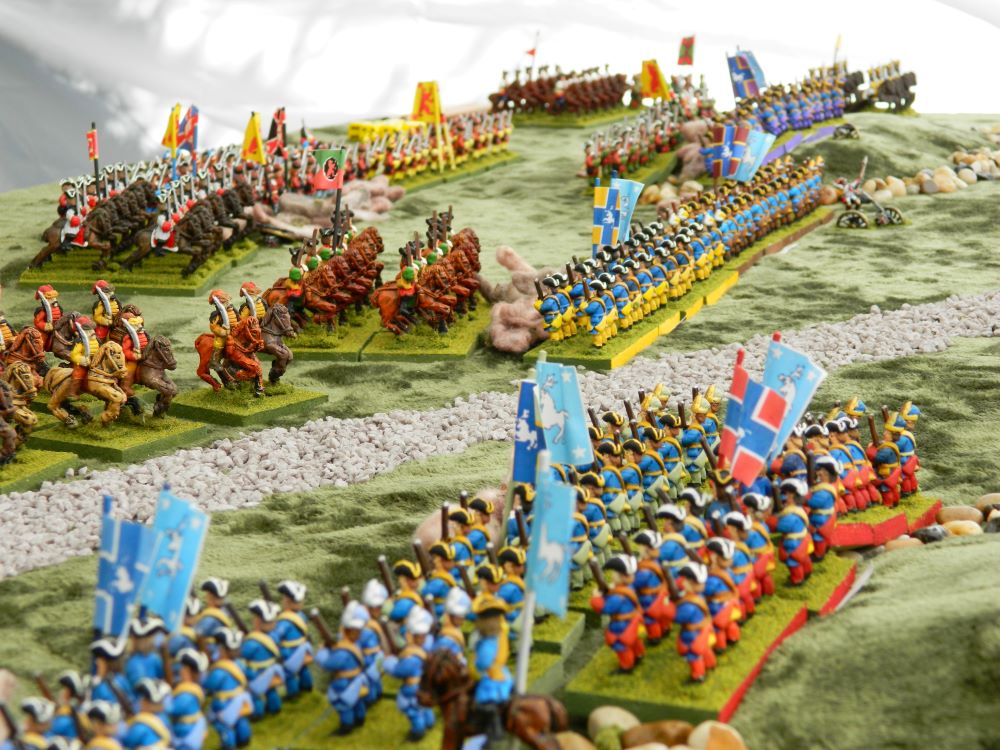
  The Royalist rearguard; Hopton's dragoons in the forefront with Howard's and Vaughan's in the middle; commanded shot in the middle distance with more of Howard's and Vaughan's horse on their flank and more commanded shot in the far distance:

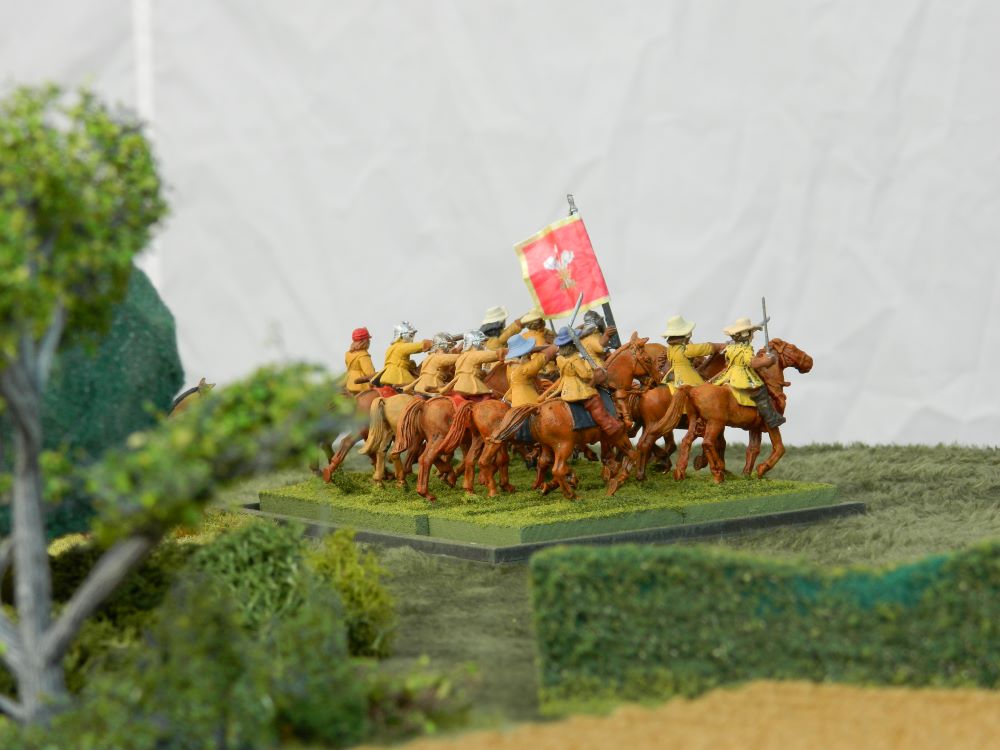
The Parliamentarian pursuit force made up largely of  small divisions of horse from Col. Robert Burghill's regiment of horse, the Gloucestershire Horse and Waller's horse...

.... with Waller's Dragoons and the Somerset Dragoons sneaking up the flanks in amongst the hedges:


Col. Thomas Howard's horse await the enemy:
Royalist commanded shot from Nicolas Slanning's regiment anchor the right flank... 

...trading musket fire with Waller's and the Somerset Dragoons:

Parliamentarian reinforcements show up early (equal to or less than the turn number on 2D6- snake eyes on turn 2!) pushing forward and the Royalist's (Howard's horse) respond with getting the first charge in:
Surely a Standard sized unit of gallopers with a commander attached and rear support, charging a Small unit of trotters would win, right? Sigh.... the photo below show the defeated Howard's horse as it breaks for the table edge:

In the turn following, the Parliamentarian dragoons win their musket duel with Hopton's dragoons... 


...  and send them on their way:

Eventually, the Royalist reinforcements arrive, in the form of Col. Trevannion's regiment of foot:

Not a moment too soon either as the Parliamentarian commander makes good use of his early reinforcements to start hemming the Royalist rearguard in:

With the arrival of the foot, Bennet's brigade of horse immediately follow,  making the battlefield a little less forlorn for the Royalists:

In the middle distance, the Royalist horse reinforcements move to fill the hole left by the defeated Howards horse:

Carnarvon's horse, with support, look to chase Waller's dragoons from the hedges on their flank but come up short in the charge:
Thus, they are exposed to a charge in the flank; they are unable to turn to face but their support is:

Although not a complete disaster, the veteran Carnarvon's horse are forced back.

Near the end of the game, this picture shows the Parliamentarian horse largely intact; the hole in the lower right recently vacated by Godolphin's commanded shot, breaking the Royalist foot battalia:
The final act of desperation by the Royalists, with the hope of inflicting some sort of damage on the Parliamentarian horse (who- on paper- were the inferior), is the charge of Howard's second unit of horse into their opponents. Nearly identical to the first charge of Royalist horse: a Standard unit of Gallopers, with flank and rear support charging a Small unit of trotters with only rear support. Sadly, an identical result as well as the snake eyes of the Break Test show:
With that, 3 of the 4 Royalist battalia were broken and officers started ordering regiments off the field. The best performing regiment for the Royalists was Slanning's regiment of foot, shown below before being ordered to retreat:


This game featured some wild die rolling from both parties right from turn 2 onwards. Oddly enough very few 3 move orders were rolled for on either side; the crazy die rolling seem to reserve itself for saves and break tests. In the past I have been a rather rash commander, a little reckless with my troops, however this time I was more conservative; sadly, my new approach did not change the Royalist's fortunes. Despite having the advantage of numbers and quality of horse I was unable to rack up a W. This leaves the Royalists 0-5 in our campaign series. 

You will have noticed some different paint jobs on some of the Royalist horse; I had to pilfer some from Jeff's collection as I seemed to have misplaced about a dozen of my own. As before, we used Warlord Game's Pike and Shotte rules with amendments from To Kill A King. Something to note is that we have not been using Blunders; we started the campaign without them and decided to carry on as is. Next up is Lansdowne Hill, which should be interesting...

Edit: The Parliamentarian version of the battle is available here.

Monday 19 July 2021

Crimean War Turks

The Naniamo Historical Wargamers have taken on a new period: the Crimean War.


 A number of us each chose a Nationality or two and a batch order was put together by Nate through Eureka Miniatures USA ; I chose Ottoman Turks (the flags I ordered from Maverick Models).
 I haven't painted many 15mm figures (these are 18mm- close enough), just a few Xyston Carthaginians. The Ancients were easier as there is less detail on the figures whereas these figures have belts, pouches and hardware. Some of it is quite fine and it was sometimes hard to tell what was flash/miscast and what was sculpted and intentional. Younger eyes may have been beneficial.
Not a lot of free info on the intrawebs but the colours were pretty straightforward to paint: Prussian blue ( a little brighter in the photos than in reality) with a lots of red details. There are a few plates to view online, some blog posts and the Wargames Foundry pics from the webstore (which are not great) so I ordered Turkish Uniforms of The Crimean War  from Caliver Books, mostly for the info on the flag bearer and officers. 


As the Ottoman Turks play a relatively small part in the battles we have planned I have French on the painting table right now in similar numbers.
 

Tuesday 29 June 2021

An Imaginations Game: Wars of Stagonian Aggression

 This past Sunday a few of us got together at Murdock's and rolled out the 18th century collection of our dearly missed friend Jeff (aka Jeff of Saxe-Bearstein, aka Bluebear Jeff).


The scenario was loosely based on one at the back of Warlord's Last Argument of Kings supplement for Black Powder, Cherbourg. In our case, it featured the army of Saxe-Bearstein, lead by Duke Otto Von Ranulfsson, retiring from a punishing campaign in Stagonia, and attempting to extract itself by evacuating it's infantry by jolly boats to waiting ships at the mouth of the river. Once per turn a regiment on the table edge could be removed; however Stagonia had a mortar battery that could hamper the evacuation with a successful die roll of 5 or 6 once per turn. 

At deployment, things looked positive for Saxe-Bearstein as a number of Stagonian regiments started in reserve and one of their own was ready to board some boats when their turned arrived. Saxe-Bearstein in the forefront, Stagonians advancing onto the table:
Things turned sideways though as the Stagonian mortars found their target for their first two turns increasing the boarding time from 1 turn to 3! With such luck so early on it became apparent that Saxe-Bearstein would have to concentrate on the fight and not the flight! The Stagonians prepare to advance on the re-organised Saxe-Bearstein in the distance:
On the other flank, Saxe-Bearstein grenzers patroled...
.... before the Saxe-Bearstein cavalry go on the offensive:

Stagonian infantry pressed forward to musket range:
After a strong start, the Stagonian command staff led by Le Comte Roberge Le Ferrier had a difficult time getting troops follow orders, often stymied on the first order.
On the Saxe-Bearstein left flank the cavalry battle continued with much toing and froing, eventually the horse commanders from both sides get involved in an effort to break the stale mate:
With the battle winding down, Ranulfsson attempted to smash through the centre with his elite cavalry. 

Although they were successful in pushing back the veteran Stagonian infantry, they themselves were shaken and unable to follow up their success. The creme de la creme of Saxe-bearstein cavalry, the Von Comocks Kuirass, before they retired from the field:
The cavalry battle on the Saxe Bearstein left flank and in the middle ultimately achieved nothing for either side, the horse brigades both ending up broken. This last photo is from mid/late in the battle just before the final push: 

Sunset and attrition forced the Stagonians to leave the Saxe-Beastein force stranded on the beach. Although a victory for Stagonia (Saxe-Bearstein was unable to extract a single regiment) it was a Pyrric one as they quit the field with a broken army. Aside from the lucky strikes with the mortars early on, which forced Ranulfsson to adjust, consistent poor command rolls stalled the Stagonians, especially late in the game when Le Ferrier and his commanders could not Rally units, leading to broken brigades. This failure of the leadership is what turned this game from a great victory to a very costly one for Stagonia.

Jeff's collection is made up entirely of Bloodaxe Miniatures, no longer in production, painted in Deltacoat and Ceramacoat craft paint in a bold, simple style with a flat finish. They make for very colourful armies on the table top. The buildings are also from his collection, and are from a Christmas village collection (not sure the brand) the style of which really suits the figures.

Rules used were Black Powder with stats based on the Prussian Seven Years War list in Last Argument of Kings. As usual, regiments that Jeff listed as Veteran were given the Steady and Elite4+ rule. A few units Jeff had labeled Superb and they were given Superbly Drilled in addition and a couple foot regiments were also given an extra pip of Stamina. These made for very steady regiments. 

Murdock broadcasted the game live over Twitch and will no doubt have an edited version available sometime in the future.